
{note: for some reason I put my orange pen in the photo even though I actually used my black one}
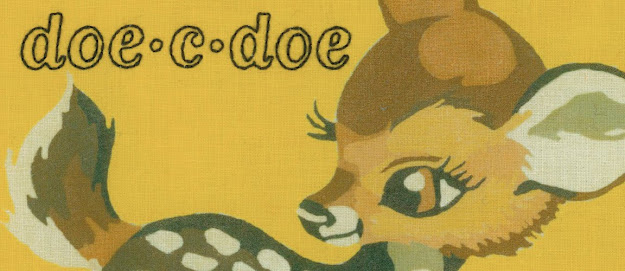
the first step is to create the lettering - for the plates I made previously I used the home sweet home font which I found via this post on how about orange. this time however I wanted something different so I looked through some of my vintage cross-stitch books:

I used my computer to size & re-create my favorite using the "x" from the font but you could just do it by hand or with graph paper.

next tape carbon paper onto the back of the printed design:

then tape the combo onto the ceramic item - since mine was curved I cut in certain places to help the paper lay flat:

using a pen draw over the design - to make sure your lines are nice & dark you'll want to press hard and don't be afraid to do it a couple times. before you remove the papers you can look at your pen marks to make sure you got all the lines:

this is how it will look when you remove the papers. be careful not to touch it or you'll smug it, on the bright side if you're not happy with your placement you can just wipe it off & try again!

next step is to draw over all the lines with the porcelaine pen. I used the bullet tip on this one as well as all my previous projects. {have a piece of scrap paper available to write on if the flow is too heavy or if you get something on the tip.}

I just take my time and try not think too much about it...keep in mind that little mistakes won't be as noticeable as you think they will when you're all done:

the pen dries very quickly but if you make a mistake you can scrape it off, I just use my fingernail. the last step is to wait 24 hours then bake it according to the directions which will make it dishwasher safe. for the decorative plates I did previously I didn't bother baking though.
so there you go...hope that all made sense, if you have a question feel free to post a comment & I'll do my best to answer it.
UPDATE: after following the manufacturers directions for baking the mug it was NOT dishwasher safe! some of the pen came off :( very gently handwashing, while avoiding rubbing the pen marks worked but obviously is not a great solution for an item that is used often. in the future I'm going to reserve doing this on only decorative items...


159 comments:
Oh, thank you for this Gina! I love your porcelain pen projects, so it's really nice to see the steps broken down!
Thank you so much for sharing how to do this! I have been wanting to know how this was done! I can't wait to try it.
You are so awesome for sharing this!! i actually have to get some porcelain pens this week to decorate a big piggy bank for my niece. perfect timing!
Thanks so much for the step-by-step! I really loved the plates you did previously so thanks for sharing how you did it. I'm going to have to give this a try!
Wow! What a great idea!! it looks wonderful! :)
Brilliant idea! I'm digging out my pens now!
Oh Wow! Those pens look like they could be highly addictive.
fantastic! thank you! I needed a kick in the pants to go buy a pen after seeing your work before. the carbon paper seems a great idea for the transfer - thank you!
Wonderful DIY!! I've seen this done before but I love your take on it. Using an unexpected medium is so eye catching- you just don't see cross stitched porcelain mugs on a regular basis ;)
I love these. Can you bake your dishes in the oven or do you need a kiln? Thank you!
thanks everyone for your comments - I hope you have fun making your own versions :)
{Ravina you just bake them in your oven.}
you have such a steady hand! I couldn't believe those lines were done without a stencil. you are plain awesome xo
This is such a great project with the Pebeo Porcelaine markers. We would love to feature it on our MarkerSupply.com blog. Please let me know if you'd be interested. Molly (at) markersupply.com Thanks for sharing!!
-molly
Fabulous tutorial!!
Thanks for inspiring me to buy a ceramic pen;)
This is brilliant! I added it to my Pinterest board "Fresh from the Kiln" http://pinterest.com/jenniferb/fresh-from-the-kiln. With full credit to you, of course, and a link back!
Aw, that's such a cute idea. Thanks for sharing!
Incredible. I always thought those ceramic pens would look too chunky, but you've got me dreaming up things to try. Thanks!
This is great!!! did you see you were featured on craftzine???
Gina, wanted to say again this was fabulous. Bought a thrifted mug, got my "r" transferred onto the mug just using soft lead pencil, but then, alas, my newly bought pen turned out to just blob out paint onto the mug - the tip did nothing for me. I used a pebeo fine tip pen in orange. Is this generally how things go with them, or do I have a wonky pen? Any tips are much appreciated. Thanks!
thanks everyone for the additional comments - I'm so flattered the post made it to the readymade & craftzine {thanks cassie for the fyi} blogs :)
I've got a little update - I gave the mug to my friend this weekend after baking it as directed & it was NOT dishwasher safe! I would recommend if the piece is not decorative that they be gently handwashed.
I’m sorry that happened Ravina :( I did get a bad pen once – almost as soon as the ink saturated the tip, the tip fell out. I brought it back to the store {michaels} with my receipt & they let me exchange it for another one which worked fine.
I do make sure that if I press the pen down to add ink to the tip that I test it on the piece of scrap paper first to make sure that there’s not too much ink. If there is I write a bit on the paper before I go back to drawing onto my ceramic.
OMG! Look at you featured on CRAFT.
And is that mug for me since it's a "J" mug? (wink, wink)
Great running into you Friday!
This is so simple and fun! Thanks for sharing all the steps, I'll totally be giving it a try very soon.
Ok, the word verification I'm getting is 'pantlega' it's making me giggle waaaay too much :)
Wow, this is awesome! Where do you find carbon paper?
Very, very beautiful. Gran idea.
www.sissy-atelier.blogspot.com
My husband is a ceramacist and I just shared this idea with him. If he comes up with a good dishwasher safe alternative I'll pass it along.
Gina the pen you want to use for this project is the "pebeo, vitrea 160". They are non-toxic and I have used it on mugs and it IS dishwasher resistant after baking. It also comes in a range of colors. I have used my mugs for over a year, and even at "high temp scrub"I have yet to see any problem. I love the cross stitch idea, genius! BTW, here is the link for them, I have only found them online.
Great post! Keep it up the good work and also keep posting.
I wonder if a clear coat over the mug would help it be more dishwasher safe?
Hi, i have always read on these site, thx for it
Nice post I like your site very well and I continue visit on this site for more information.
Super blog and nice to read.
lease submit your secure loan request
That mug is very cute! Thanks for sharing, it's a great DIY idea :)
xo Josie
http://fashionisontheroad.blogspot.com/
This is a nice information shared here. This was worth the reading. I love it! :D I love the idea.
I've heard my friends talk about this porcelaine pens but I never thought that these would be really great. Are there various colors available for this pens? Will it be okay if I use cross pen refills for these pens?
Its like you read my mind! You seem to know so much about this, like you wrote the book in it or something. I think that you can do with some pics to drive the message home a little bit, but instead of that, this is great blog. A fantastic read. I'll certainly be back.
I really loved the post so I used my Digg account to digg it.
Fantastic weblog report with this issue,I am not too long ago in the website twice right now.I simply needed to declare hi plus indicate this thanks for the information offered.advertising pens
Nice tip about the carbon paper. I'll be trying that! Thanks.
Thanks for sharing..It's nice
parfum
San Diego Hills
gLutera
Teralis
This text is really worth everyone’s concentration. It sounds really go0o0d. mont blanc pen
This text is really worth everyone’s concentration. It sounds really go0o0d. mont blanc pen
Great! Thanks for sharing the information. That is very helpful for increasing my knowledge in this field.
pacman |happy wheels |my little pony games | unblocked games
friv4 kizi 4| unblockedgames | unblocked games for kids
You need to kill time, you need entertainment. Refer to our website. hope you get the most comfort.
Thanks you for sharing!
http://www.friv-online.net Friv
http://www.friv-online.org Friv Games
http://www.Yepi4Girl.com Yepi 4
http://www.kizi4girl.com Kizi 4
I just wanted to say thank you for sharing a great information and useful. I've read a lot of blogs and visit but they made me feel boring. Your article made me feel strange and fascinating it attracted me. I wanted to share this information with my friends on the social network facebook.
G9 , Dora , Kizi new , Huz Games , Kizi 2 , Friv 4 School , 85 Play , 4223 Games , 85 Games
Such a very useful article. Very interesting to read this article.I would like to thank you for the efforts you had made for writing this awesome article.
Friv 1000
obat herbal untuk kutil di kemaluan
jual obat herbal untuk herpes
cara mengobati kutil kelamin
obat untuk kutil di dalam vagina
penyebab kutil kelamin
gejala kutil kelamin
tips mengobati kutil kelamin
jual obat herbal untuk kencing nanah
CARA TERBAIK MENGOBATI KUTIL DI KEMALUAN
Cara Alami Mempersempit Vagina Wanita
OBAT HERBAL UNTUK MENGOBATI KANKER SERVIKS SAMPAI TUNTAS
JUAL OBAT KEPUTIHAN HERBAL
JUAL OBAT WASIR HERBAL
article that you created and you have, very nice, charming and perfect to be listened to and used as a reference of quality.
thank you for sharing a remarkable job, hopefully more successful and we wait for the next post
Cool stuff. Thank you it really inspiring and great insight.
A very insightful information and it very helpful. In case need some info about tangki fiberglass. Thanks for sharing.
I wonderment why other professionals don't respond your website overmuch m happy I plant this. agen domino
Very helpful advice in this particular post! It’s the little changes that make the largest changes. Thanks for sharing!
tank trouble 2 | run 2 | tank trouble | run 2 game | tank trouble 3 | | run 2 online
Run 3 thanks for sharing your entertainment Games is an indispensable thing in life. And we want to introduce to you a lot of fun to the game you can unleash yourself with the appeal that they bring. Thank you!
run 3 game
run 3 unblocked
play run 3
I enjoyed over read your blog post. Your blog have nice information, I got good ideas from this amazing blog. I am always searching like this type blog post. I hope I will see again.
Moneylender in Singapore
Licensed Moneylender
العاب تلبيس العاب بنات العاب بنات العاب تلبيس
Thanks for posting this article, it's very useful for me.
Posts shared useful information and meaningful life, I must appreciate the way you have express your feelings through your blog!.
Thank you for sharing!
jeux de friv 2017
I am really empowered with your writing talent. Anyway keep up the wonderful high
quality writing, it’s rare to see a great blog
such as this these days.
Nice! thank you so much! Thank you for sharing. Your blog posts are more interesting and impressive.
geometry dash apk l geometry dash game l geometry dash l download geometry dash l geometry dash app
Wonderful blog! This is very informative site. I am totally pleased by your excellent work.
al3ab
al3ab cooking
Please visit our website to relieve stress
There are things lost and I feel sorry that I did not appreciate. But there are also new things and I lost relieved realized: Yeahhhhh, and I stress, yet
Friv Games
Y2
Friv 200
We are thrilled to have you on our team and this is exactly why we need you.
Friv
Yepi
Troll Face
Friv1000
The biggest agar.io game servers and different modes, We are the best and fastest Agario Private Server. Friv 20 is where all the free friv games,juegos friv, jogos friv and jeux de friv are available to play online, always updated with new content.
bahaya limpa membengkak
cara menambah cairan sendi
obat megakolon
All Driver Printer
Happy New Year Wishes 2017 are all about warmth, friendship and trust that will definitely touch the heart of those who are being wished.
happynewyearmessage.org
new year 2017
Great Sharing also visit Winrar filehippo website for All Latest and New Softwares.
تعتبر الالعاب على الانترنت وسيلة رائعة في تنمية الاطفال والجيل الجديد بحيث اصبحت الان احد اهم الاشياء التي يجب عليها التواجد في العديد من المواقع الالكترونية ومن افضل الالعاب التي يتم مشاركتها على مواقع التواصل الاجتماعية هي العاب سيارات اخدت المركز الاول طبعا فهي رائعة وممتعة في اللعب
really amazing post .... keep it up
Juegos Friv 4 | Kizi 1000
This is very good site VLC FileHippo I enjoyed it
dat mua ve may bay di con dao gia re
dat ve may bay di malaysia gia re 2017
hinh anh ve may bay di boston cua hang
I have heard so much about them, but then i never got to know how to use porcelaine pens, Even though i would do it differently, i can say that your blog has been of great assistance. The way you do it is probably how almost everyone else would. You are very talented. Masters Literature Review Help Thank you for sharing.
Very interesting blog. Alot of blogs I see these days don't really provide anything that I'm interested in, but I'm most definately interested in this one.
tutorialsrex | tutorialsrex blog | Tutorialsrex .com
Mais uma vez, obrigada ao Parlamento por comungar da visão que informa a nova política dos consumidores Friv 2018 YooB assente no mercado Friv 2018 Friv4school 2018 YooB Friv YooB a visão de um mercado de YooB Friv Friv 2018 YooB consumidores informados e capacitados que procuram e usufruem
Senhor Deputado Cashman, agradeço-lhe a informação. Friv Jogos Friv 360 Friv4school A todos que partilham e trabalham sob estas mesmas convicções e princípios Jeux De Friv Roblox Mais uma vez, obrigada ao Parlamento por comungar da visão que informa a nova política dos consumidores Friv Friv 4 Jogos De Five Nights at Freddy's Friv 3 assente no mercado - a visão de um mercado de consumidores informados e capacitados que procuram e usufruem, com confiança,
you have such a steady hand! I couldn't believe those lines were done without a stencil. you are plain awesome xo
Heating Repair Services
Danke, dafur dass Ihr jeden Tag mit uns die Hl. Messe gefeiert habt, fur all die Reparaturen im ganzen Haus Jeux De Friv 10 Jogos Friv 2018 Jogos Friv 2019 fur Euere Bereitschaft YooB YooB Friv immer zur Verfugung zu stehen YooB Juegos De Twizl Friv 2018 YooB Danke, dass Sie Ihr Muhen um den Aufbau des Leibes Christi mit uns teilten.
شركة عزل اسطح بالدمام
you have such a steady hand! I couldn't believe those lines were done without a stencil. you are plain awesome xo Security Guards
شركة كشف تسربات المياه بالقطيف
شركة كشف تسربات المياه بالاحساء
Wir danken Ihnen
Friv4school 2018 Gry Friv 2 Gry Friv 5 dass Sie diese Hoffnung mit uns teilen und diesen Schritt auf dem Pilgerweg des Vertrauens Gry Friv Juegos Friv 100 Juegos Friv 1000 mit uns gegangen sind. Juegos De Friv 2 Juegos Friv 250 Juegos Yepi wir danken Ihnen für das Interesse an unseren Produkten und hoffe
I really enjoyed reading your article. I found this as an informative and interesting post, so i think it is very useful and knowledgeable.
Friv
Sr. Cashman, le doy las gracias por esta información. Friv 2019 Friv Friv 2018 n todo momento puede Gry Friv 3 Friv 2019 Friv optar por compartir su información personal con terceros. Friv Friv 2020 Friv Gracias por compartir su pasión por el mejoramiento de las vidas de los niños en el Estado de Nueva York
Thanks to information shared by the author. hope the author has many more interesting articles
VPS Hosting
You have a unique and different way of using the porcelain pen and I will be borrowing some tips. Your post is very creative and I am looking forward to following more posts from this blog especially on DIY skills. In case you need writing services, feel free to hire our writers by clicking on Best Help with Proposal Formatting.
This is a great web site, Good sparkling user interface and, very informative blogs. I have found it enormously useful. Thanks you very good !
Kizi 9
Kizi 8
Kizi 7
Thanks to information shared by the author. hope the author has many more interesting articles
Y8 Games http://www.y8gamess.net
Friv 1000 http://www.friv1000gamess.net
Friv 4 http://www.friv4gamess.net
Really impressive post. I liked your article and I hope you will have many entries or more. I enjoyed your article and planning to rewrite it on my own blog.
VPS Hosting in Pakistan
KMSpico |
KMSpico 11 |
KMSPICO Official |
Latest KMSpico
Farsi1hd serials download
Farsi1hd serials
click here
watch now
visit here
visit more
check here
check out here
visit here
I liked this decoration. Congratulations.
Caro leitor, no Friv Jogos você encontra uma imensa variedade de jogos on-line sem pagar nada! Temos muitos jogos divertidos e gratuitos, com novas inserções e atualizações diárias! Você encontrará JOGOS FRIV 2, FRIV 3, FRIV 4 e FRIV 1000 e FRIV 360. Aproveite e boa diversão!
i am always looking for some free stuffs over the internet. there are also some companies which gives free samples:
http://friv5.me/ - friv5 - juegos friv - friv 5 online - friv5 games - friv com
Your articles are very useful. I really like them. Explore cool games Shellshock Live | G-Switch 3
i am always looking for some free stuffs over the internet. there are also some companies which gives free samples:
Friv Jogos online
i am always looking for some free stuffs over the internet. there are also some companies which gives free samples: Friv Jogos online
Nosso site tem muitos jogos interessantes. Compartilhe isso com seus amigos e divirta-se.
Jogos Online Wx
Jogos do Cartoon Network
Jogos do Roblox
Nosso site tem muitos jogos interessantes. Compartilhe isso com seus amigos e divirta-se.
Jogos Online Wx
Jogos do Cartoon Network
Jogos do Roblox
تنظيف بحفر الباطن
شركة نوران توفر مجموعة كبيرة من خدمات تنظيف المنازل بحفر الباطن هذه الخدمات هامة ومميزة للغاية لدى سيدة المنزل بحفر الباطن وهدفنا هو توفير الوقت والجهد وإزالة العبء عن عاتق ربة المنزل ومساعدتها في تنظيف بيتها وجعلهُ نظيف ورائع أمام أبناؤها وأمام ضيوفها وأقاربها لذلك ينبغي عليها دائمًا جعل البيت مرتب ونظيف وهذا صعب للغاية في حالة إذا كان البيت كبير فتحتاج إلى بذل مجهود مضاعف وربما لن تحصل على النتيجة المرجوة ولكن معنا بإذن الله سيكون بيتك رائعًا ونظيفًا ومرتبًا للغاية, لإننا نعمل في هذا الجمال من 10 سنوات ونعتبر نحن أقدم مؤسسة متواجدة بمنطقة حفر الباطن, ومن أولى الشركات المتميزة في مجال تنظيف البيوت والمنازل, نقوم بتنظيف كل شيء بدءًا من تنظيف المراتب ومفروشات غرف النوم والصالونات وأثاث البيت وقطع الأثاث وقطع المطبخ والحمامات, حقيقي ستتفاخري أمام أصدقاؤكِ وأرقاربكِ بمنتهى النظافة والنظام التي ستحصل عليه من قبل شركة تنظيف بحفر الباطن نوران شركة عريقة.
شركة تنظيف بحفر الباطن
http://bit.ly/2Hp8JWK
Lindo diseño. A veces me pregunto qué sería sin los osjuegos en la vida de los niños.
Escolha algumas roupas totalmente incríveis de modo a jogos friv antes do irem ao cinema ou ao parque por diversões favorito delas.
A citação é o que faz toda a diferença, o que raramente dá importância e jogue online aqui :FRIV e você verá vários jogos interessantes.
Friv Jogos
Jogos Online
2
Jogos Online
BLOGGER
Humor
Jogos 360
Click Jogos Pro
Jogos FRIV
Jogos Online
Friv
Thank you for this information Friv 2019 Kizi 2018 Friv4school 2020 but please understand that as a representative of the Council Friv 2018 Kizi 2018 Yepi 2018 I am not at liberty to comment Friv4school 2018 Friv 2018 Friv 2018 on the data or the situation for an individual Member State.
Thank you for this information Kizi 2018 Friv 2020 but please understand that as a representative of the Council Friv 2018 Kizi 2018 Yepi 2018 I am not at liberty to comment Friv4school 2018 Friv 2018 Friv 2018 Friv 2018 on the data or the situation for an individual Member State.
Very nice post. thanks for sharing such a good article.
Thanks for the information, Very useful
ويكى اكسترا
Thanks for sharing your info. I really appreciate your efforts and I will be waiting for your further write ups thanks once again.
Raksha Bandhan Mugs
prześcignąć konkurencję z tych sztuczek http://www.jogosfriv2018.com.br/ http://www.friv360.com.br http://www.gryfriv5.com/ napisał w Gry http://www.gryfriv10.com http://www.gryfriv3.com/ http://www.gryfriv.info Pobierz demo gry przed zakupem http://www.gryfriv5.net/ http://www.juegofriv4.com http://www.gryfriv2.net http://www.gryfriv4.com/ Podgląd gry może pomóc zobaczyć, jeśli chcesz kupić pełną wersję, czy nie
Gracias por compartir su pasión por el mejoramiento de Friv 2019 Friv 2019 Friv 2019 las vidas de los niños en el Estado de Friv Jeux De Fille 2019 Jogos Friv 1000 Jogos Friv 4 Gracias por vuestras reacciones a Juegos Friv 2019 Juegos Kizi 2019 las transmisiones que os han hecho.
Great site! I really cherish how it is simple on my eyes it is. I am considering how I may be informed at whatever point another post has been made. I have subscribed to your RSS which may do the trap? Have an incredible judi poker
مشد البطن بعد الولادة الطبي :
مشد البطن بعد الولادة الطبي ، لا غنى عنه لعلاج زيادة حجم البطن بعد الولادة ، فهو يوفر قوة شد كفيلة بإصلاح مظهر البطن وإعادتها إلى شكلها الطبيعي قبل الولادة ، حيث يتكون المشد من ثلاث طبقات داعمة ، ينصح باستخدام مشد البطن بعد الولادة الطبي ، بعد الولادة الطبيعة بيومٍ واحد ، وبعد الولادة القيصرية بأسبوع .
مشد حراري
مشد الظهر
مشد البطن
Bạn BỊ ĐÁNH LỪA bởi những câu hỏi dễ
Trong những bài kiểm tra, thi thử, bạn vẫn bị mất điểm lãng phí bởi những câu hỏi quá dễ.
http://asmfl.com/cms/UserProfile/tabid/109/userId/14425/Default.aspx
http://data.adequate.at/sachonthidaihoc
https://git.regardscitoyens.org/sachonthidaihoc
http://www.radiologycases.com/index.php/radiologycases/user/profile
http://www.lipapromet.hr/UserProfile/tabid/43/userId/4172/Default.aspx
http://blueridgemanorky.org/main/UserProfile/tabid/57/userId/5945/Default.aspx
https://ecastats.uneca.org/acsweb/cr/UserProfile/tabid/866/userId/741045/language/en-GB/Default.aspx
تمتعوا الان بافضل خدمات شركة تنظيف شقق في مكة المكرمه اي انهم يعملون جيدا في تنظيف الشقق والمنازل وتوفير كبري شركة تنظيف بالبخار في مكة المكرمه التي يتميزون بتنظيف السجاد والموكيت بوسائل التبخير التي تستخدم في شركة جلي رخام في مكة المكرمه بافضل وسائل الحديثه المستخدمه في تنظيف الرخام جيدا ولان تتميز شركة تنظيف خزانات بمكة بتوفير كبري شركة رش العتة في مكة المكرمه فهي تعمل جيدا في مكافحه الحشرات وابادتها جيدا
Treadmills are considered to be a standout amongst the most used workout equipment as a result of numerous mental and physical benefits. Owing to this, a lot of individuals intend to buy a treadmill for their personal home use. In any case, with a lot of options available on the market, there may be a few challenges with regards to picking the correct system. This is the aspect where you apply your own standard.
You need to kill time, you'd have time to look these kids active. Refer to our website. Hope you get the most comfort.
Thanks for sharing !
Cho thuê nhà vệ sinh công cộng
Cho thuê nhà vệ sinh
Cho thuê thùng đựng rác
Bài viết quá hay...
cửa lưới chống muỗi
lưới chống chuột
lưới chống côn trùng
lưới chống muỗi inox
SpreadtrumSP Flash ToolStock RomBest Online StoreService HPBuku Servis HPKredit HPToko OnlineHP HangKomponen HP
www.lampunginfo.com
Indonesia
beritalampungmedia.blogspot.com
Best Online Store Indonesia
Store Indonesia
Thank you admin, This article is great. The entertainment website to this article:
findclips
googleclip
getclip
gitclip
youtuclip
vuiclip
anyclips
clip hai huoc
enterclip
superclip
Great post you have there. It has enlightened me and added knowledge about the subject. You can also look at data analysis assignment .
Thanks for sharing this an interesting post. You shared a detailed post about pens and stationary. This post is very helpful for students. I really liked this post. I appreciate your hard work. Get help from dissertation writing services , a leading writing company UK.
Cool math gamesRegardless of their age or occupation, all of them enjoy the multitude of online games present on the internet that become a passion for them should they spend a large amount of time playing them.
www.coolmathgames.com
What a nice blog! I have enjoyed reading through the article although I landed on this site while I was looking for greenhouse equipment suppliers in Kenya. I will be visiting this site occasionally to read more interesting and intriguing articles. I hope the writer will continually keep us updated with new information.
Great and informative post. I really liked this post. Here, we can find beautiful imagery and authentic content. By: Buy Dissertation Online.
I am talking about an escort lady who has been feeling very lonely even though she meets many persons yet she feels alone and does not want to believe upon anyone, here I am showing the link of Riya by which you can see her images and also make contact if you will desire to contact her.
Nice post, I will be trying it. You can visit Project Editing Help if you need help with refining your article.
aphelios ct
Sylas Ct
Lucian Ct
sett ct
Lucian Ct
Good post
شركة تنظيف منازل بنجران وشركة تنظيف الشقق من الشركات التي تقدم جميع خدمات النظافة (كالفلل والشقق والقصور) لأنها توفر أعلى مستوى من المهارات فى تنظيف الخزانات شركة تنظيف خزانات بنجران وعمالها بأعلى مستوى من التدريب. بشهادة عملاء الشركة بالداخل والخارج
كما تقدم خدمة مكافحة الحشرات من المصدر
شركة مكافحة حشرات بنجران.
تحرص شركة تنظيف الشقق على تقديم أسعار غير مبالغ فيها ونقل كل مايحتوى علية المنزل من خلال شركة نقل اثاث بنجران، ومقارنة مع الشركات الأخرى ، تلتزم بتطبيق قواعد العمل المعقولة ، مما يجعلها الخيار الأفضل عند التفكير في تنظيف منزلك. تشتهر شركة التنظيف بعملائها السابقين من الشركات الذين يشرفون على أعمالهم سواء كانوا مؤسسات أو شركات أو مدارس
تسليك المجارى مهمتنا من خلال افضل العماله والمدربة على تسليك وتنظيف المجارى والبلعات من خلا شركة تسليك مجارى بنجران
تعتبر شركة تنظيف بالباحة راحتك من الشركات المميزة في مجال التنظيف بوجه عام حيث أنها توفر للعميل جميع الامتيازات من خلال شركة تنظيف منازل بالباحة والخدمات التي يحتاج لها لتنظيف منزله أو مكان عمله، وتستخدم الشركة أفضل أنواع المنظفات المثالية من خلال
شركة تنظيف موكيت بالباحة التي يمكنها التخلص من جميع البقع التي قد تتسبب في جعل المظهر العام غير لائق ولهذا يسعد الجميع بالتعامل مع تلك الشركة المميزة الرائدة في التنظيف ومكافحة جميع انواع الحشرات والقضاء عليها بكل سهوله للتواصل من خلال المصدر
شركة مكافحة حشرات بالباحة
تأسيس شركة في المنطقة الحرة بدبي
I want to always read your blogs. I love them Are you also searching for dissertation writing services? we are the best solution for you. We are best known for delivering Nursing dissertation writing services to students without having to break the bank
We Provide Professional & Insured Moving, Packing, Relocation,
Removals, International Freights, movers in al ain
& Storage Services in al ain.
Wow very cool... I like the blog
Sioux City Window Glass Repairs
Liberal KS Fast Exterminator
Investor Friendly Contracting Near Me
Professional Contracting Near Me
Buy My House Fast
I found some useful topics in this well detail form. Thanks. Good job you did it!
I really appreciate reading this blog it is very impressive and informative content.
Good job.. Awesome blog post, I really appreciate if you continue this in future.
Global Assignment Expert helps you understand various concepts and get the best grades with less effort in your assignment. Writing an assignment needs a creative and competitive mind. We at Global Assignment Help have the right qualifications and professional experience experts for each field. They help in your assignment to score high grades in your academics. Besides these, their customer services can help you at any level.
Before diving into your porcelain pen project, it's essential to gather the necessary materials and prepare your workspace. Start by selecting high-quality porcelain pens in a variety of colors to suit your design preferences. Ensure that your porcelain surface is clean and dry, free from any dust or debris that could interfere with your artwork. Set up a comfortable and well-lit workspace where you can work with ease and precision.
bankruptcies near me
I desire my website loaded up as quickly as yours lol
This content will help me to complete a paper that I’ve been working on for the last 2 weeks.
Took me time to read all the comments, but I really enjoyed the article.
I like the helpful information you provide in your articles.
Nice! It's really good and awesome..
Hello, I found your blog through Google.
The information provided is really very good and helpful for me. Keep sharing good information
Enjoyed reading the article above, the article is very interesting and effective.
I am truly grateful to the owner of this web page who has shared this impressive article.
It is in reality a nice and useful piece of information. Thank you for sharing.
This website is beautifully designed!
Using a porcelain pen is an excellent way to customize ceramics like mugs, plates, and tiles. Here’s a step-by-step guide to help you use one effectively:
😊To excel in the pharmaceutical representative job search, start by obtaining a relevant degree and networking within the industry. Customize your resume and cover letter, highlighting your product knowledge and communication skills. Research companies thoroughly and consider informational interviews. Stay persistent and informed about industry trends to enhance your chances of securing a position.authenticnews
Creative
With in-depth knowledge of the NDIS, a consultant guides participants through eligibility, planning, and service coordination. They act as a trusted ally, ensuring each person receives the support needed to live a fulfilling, empowered life.
NDIS Consultant
NDIS Certification
NDIS Verification
How to become an approved ndis auditor
how to get ndis clients
how to become an unregistered ndis provider
If you want brilliance and romance in one design, Aurika Gems’ Hidden halo engagement ring and timeless Round cut engagement rings are ideal.
Well done! You are plain awesome xo [Security Guards](https://www.kpsssecurity.com/)
Клиенты могут выбрать продукцию для бытового, коммерческого и промышленного применения. Master Flame гарантирует официальную сертификацию, оперативную доставку по Украине и профессиональную консультацию.
Need a trustworthy relocation service? Moving Company in Ras Al Khaimah by Budget City Movers ensures a smooth and safe move for your home or office. Call now at 055 6254 802 for a free quote!
Moving Company in Ras Al Khaimah
Post a Comment